Loading data to Snowflake via web console
August 1, 2021
It’s been a long time since I have written any content on my blog. I would like to reignite my love for writing technical blogs again and so starting off with something that I am currently exploring.
I have been learning Snowflake and just going to share some basics on what you can do with this cloud-based data storage and analytic service. Would not bore with introductions or any theory on how it works, I would jump into some basics on how you upload data into your cloud storage using the web console of Snowflake.
(Please note that Snowflake does gives you a 30 days of trial access to their services with limitation on amount data and storage you can use which is good enough to get some hands on with this platform. Just google for ‘Snowflake trial’ and it will take you to the right page to get started.)
With no further ado lets get started with a quick look at data upload on Snowflake via webconsole.
Login to your Snowflake web console, where you might have a Database or create a Demo DB as I have in my screen below.

I am to use my ‘DEMO_DB’, and create a table named ‘EMP’. To do this you will have to go to the ‘Worksheet’ tab that would allow you run your queries. Again a lot should be self explored before you try this and most of it are easy and intuitive.
create or replace table emp (
first_name string ,
last_name string ,
email string ,
streetaddress string ,
city string ,
start_date date
);

Come back to the Database tab and click on your database ‘Demo_DB’ and then you see your ‘EMP’ table under it. Clicking on the table should take you to details and list of fields in the table. Then you see the option to upload data “Load table”.

Clicking on it should take you through following steps:


Create a file format if one does not exist with following options:

Click on ‘Load’ once all the steps are done:

And this shows up as success in load:

My sample data for your reference from EMployee2.csv file:

Lets query the data and look for the sample data uploaded. Please note that for small amount of data the Web console is ok, but for larger files it is advised to upload via the Snowflake CLI (SnowSQL command line) which I would try covering my next write up. Thank you!

Informatica – Registering a Power Exchange plugin
July 29, 2016
Hello all.. it’s been a very long time since i had come up with a post on my blog. Finally decided to push myself to get one simple post to have it kick started. So giving a simple post which i believe helps more and keeps me going with sharing more and more.
This post of mine shall cover an activity of administration on top of Informatica installation and more in specific to Power Center and Power Exchange. A recent activity in my assignment where we have had a recent Upgrade applied on the existing version of Informatica from 9.1.0 HF6 to 9.6.1 HF4. And so i had some really good experience and would like to bring them all to every one of you with a hope it helps few of us. I would cover a series of posts to cover all my experience and knowledge on this.
To start with, installing/configuring Plugins on a new installation or on a Upgraded version of your Informatica. When you install Informatica you either have some Native/in-built plugins or you will be forced to install some of them as external plugins which are again provided by Informatica.
For instance i had to install new version of Power Exchange for SAP and Essbase connectors to my Power Center Upgraded version of 9.6.1.
Step -1:
Install the version of Power Exchange setup that can be downloaded with help of Informatica’s GCS team. This shall be a regular installation setup which shall place the respective .xml for the Power Exchange plugin on your installation folder path of Informatica server – <Installation-folder>/9.6.1/server/bin
Step-2:
Logon to your Admin console and on your Repository settings, change the Operating mode from ‘Normal’ to ‘Exclusive’. Allows no user to access the Repository while your admin activity is carried out.
Step -3:
Registering Plugin through Admin console
This is pretty much a straight forward method, where you login to the Administrator of your Informatica with the right access.
Then on the Repository settings, at the right most pane on the ‘Plugin’ tab, would show up an empty page if you have had no other plugin installed. Click on the Plugin icon/symbol on the right top of the pane as shown below –
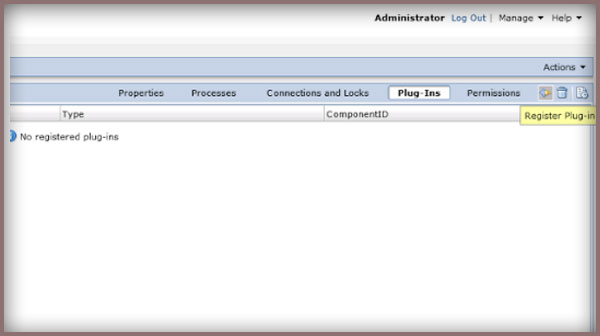
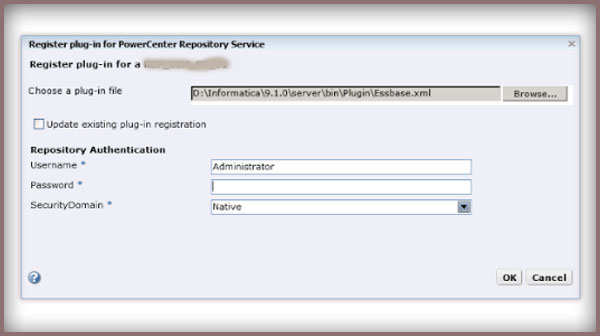
Then comes the pop up to allow you browse your plugin which should be on your Server/bin/ path as said earlier. Select and continue on with the right authorized user to complete your registration of the Plugin.
Register Plugin through Command line
This again would require bring your Repository to ‘Exclusive’ mode and then logging on to your Server machine.
To start with open your pmrep executable available at the server/bin, and connect using the administrative account and this shall have a syntax as below –
pmrep connect -r REP_name -d DOM_name -n Administrator -x admin_password
This shall successful connect your repository as Administrator.
Find .xml in the following directory: $INFA_HOME\server\bin\Plugin which would come up after your earlier Power Exchange installation. And now you can execute the RegisterPlugin command with the reference to your plugin.xml file,
pmrep registerplugin -i <$INFA_HOME\server\bin\Plugin\plugin_file.xml –e –N.
where ‘-e’ will be used in case where you want your registering has to update on top of an older version of the same plugin (you could see the same as checkbox when you did through admin console).
And ‘-N’ is required when you either install it on an already existing Repository and has just been upgraded, or if the Power Center already comprises the Plugin and only needs a registering or if you are registering an already existing plugin just to get the additional feature from a new version/upgrade of the plugin.
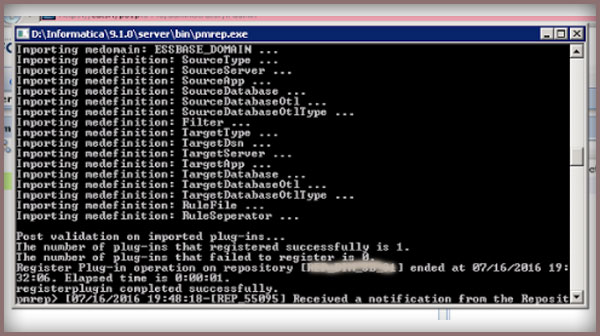
This shall successfully register your already installed plugin successfully and let you avail the feature of the respective Power Exchange connectivity.
Hope this helps, happy learning and sharing all.. 🙂
Hello All,
Hope you all had a very great Christmas and awaiting to kick off a new year soon. Before we kick off, a happy new year to all of you in advance..!!
Just when i was waking up to welcome a sunny Saturday, i had a thought mugging around me and telling me to do this. Yes to write a post on what i had been badly attacked by, it was indeed not something of a physical attack 🙂
So without further dawdling let me explain how hard i had to fight against the Target Update Override which helps me customize my Update strategy used in Informatica allowing us to Update any target table despite not having the right Primary Key combination for the Update. I have done this before and have done it with a blunder every time which taught me something right but time and again i have done the same repetitively. I just then had thought to help other fellow developers avoid this and so i am writing this blog post to help you out with the Target Update Override usage.
Probably when you go for an Update over your target, you would use the Update Strategy which would link to your target ports, the Primary key columns on which Informatica would perform an update on the rest of the columns you will be linking with the target. So there would also be a scenario where you will wish to update few fields with a conditional check over the other fields (non primary key columns).
There are two ways of doing this,
Method 1 –
Make target structure change on your Informatica side to make the Ports/columns on which you will be performing a check to update the row. This means you will have to change these check fields to have a Primary key property enabled on the Informatica end and then use the Update strategy transformation as a usual way.

Method 2-
To script down a Update sql override in the target. It’s easier to be done with a usual Update query syntax to be written on your target object in the mapping and there is a strict syntax to be followed which also means a very proper spacing to be used between the Operators and the sql literals. By default, the PowerCenter Integration Service updates target tables based on key values. You can override the default UPDATE statement for each target in a target definition. And as discussed we would like to Update on the basis of the Non key columns and this can be done something like below,
Sytax:
UPDATE SALES_TBL SET EMP_NAME = :TU.EMP_NAME DATE_SHIPPED = :TU.DATE_SHIPPED TOTAL_SALES = :TU.TOTAL_SALES WHERE EMP_ID = :TU.EMP_ID
Because the target ports must match the target column names, the update statement includes the keyword:TU to specify the ports in the target transformation. If you modify the UPDATE portion of the statement, use :TU to specify ports.
 I made a mistake..!!
I am just adding this part to save your time. I had done a very silly mistake while composing my Update override query. For a very long time my session was failing and i was unable to figure out what went wrong with the session failing stating i had my Update query wrong.
Revisiting it almost like 100 times changing all that i could and unable to get what went wrong 😦
Finally a big brick hit my head and i just copied my Update sql to the notepad and found that i had no space between WHERE clause and my operand, and i was not able to figure this out as i had it going to a next line character, just as is in below picture.. which i would think was just like a usual word wrap..!!

Hope this helps you and saves your time. Thanks for reading the post and share as it’s fun to learn and share 🙂
Informatica – Post/Pre Session Variable Assignment
February 25, 2014
Hello Friends, Time for some learning. This time i have taken up the Informatica Variables and Parameters which i am very much fond of 🙂
This time i have taken up something that i came across in one of the development my team was involved in, and there was a need to pass a value from one task/session to another as we had a check with respect to the value we get from one session to be used going forward in the process.

For instance, my requirement is to check on the count of records from session_1 and then to count on records in session_2 but with the same counter (increment from where the Session_1 count ended) ending up with the total count of records. Something like, i had 100 records in session_1 and then i have to count from there as 100+1 and so on for the session_2. Looks simple, but quite a nail biting and challenging experience while we try getting it in Informatica!!
And then we came across this approach/feature available in the Informatica ‘Pre-Session/Post-Session Variable Assignment’. Which was all about the assigning of Variable values between the Sessions and it’s Parent Worklet/Workflow and vice-versa. Interesting right? If not clear lets go with a step by step illustration for a better understanding on this.
1. All we need to do is define a Counter variable/Parameter $$v1_Count for the session_1, and then our session runs to populate $$v1_Count as a usual Mapping Variable/Parameter does.
2. Next is, to assign this value to the common Variable (that acts as an intermediate between two of our sessions) which will be the Parent Worklet/Workflow Variable defined as any other Variable in the Edit Workflow/Worklet Options. In my case i have Workflow variable $$wf_v_Count defined.
3. Now in the session_1, Components tab -> lets edit the “Post session Variable assignment” option (it can be on failure or on success),
(i) Post-session on success variable assignment
(ii) Post-session on failure variable assignment
and i define it as – “Parent_Workflow/Worklet_Variable = Mapping_Variable/Parameter”
i.e., $$wf_v_Count = $$v1_Count
So here we have the $$v1_Count value open for any task,session or Worklet under the same parent can take up and use it for processing.
4. In our case, for the next session_2, i have to go for Components tab -> “Pre Session Variable Assignment” to be defined to assign the value from the $$wf_v_Count to the respective session’s Mapping Variable/Parameter $$v2_Count.
So we define it as “Mapping_Variable/Parameter = Parent_Workflow/Worklet_Variable”
i.e., $$v2_Count = $$wf_v_Count
The same can be used all over the Parent Workflow/Worklet, in any decision tasks or on link conditions. Thus we have now passed on the value from one session to the other and can be processed thereafter. Hope this was an interesting and helpful piece to you.
Do post your comments on any corrections or queries with respect to this. Share this if it can help someone.
Installing Informatica 8.6.0 Server on Windows7
August 26, 2012
Hello all.. This post is a result of all my excitement after getting the Informatica installed on my PC after multiple times of install and uninstall attempts and wish to share with you all and make sure you get it done as I did. I am to explain the whole sequence of steps that we are to follow in getting the Informatica installed successfully on the Windows7. Here I have installed the Informatica 8.6.0 version.

Important Note: Make sure you set all things before you begin the installation. For this refer to my previous post – http://bit.ly/QggXmF
If you are done with the above, let’s start the installation right away, Click and run the install.exe (good to run as an administartor).


This shall start the Informatica Installation wizard as is seen in the below screen shot,


And now we are to give the License Key, this shall be mostly available in your Informatica Software folder location – D:\Softwares\Informatica PowerCenter 8.6.0 for Windows 32Bit\. Select the key file available ‘Oracle_All_OS_Prod.key’ and give a next.


Select the Folder location where you wish to install the Informatica, I cose the drive ‘D:’

Next comes the HTTPS Configuration. I prefer having it default and proceed with the installation

If there is a block on by your Firewall, simply give an Allow with the both options checked to allow the Informatica application. And thus the Installation shall begin.

Go for the ‘Create a New Domain’

Then comes the Database settings, I had a SQL Server as my Database and all the settings were given as per the installed Database. Don not make any change on the Custom String option, and ensyre the right Database setting by having a ‘Test Connection’.


Then comes the Domain settings, let these remain the default. All we need to do is to set a password here for the admin user.

Just have a check on the Advance Configuration and do not make any change and proceed with the installation.
And here we are done with the Domain configured, Finally the step to create user with Password set.

This will complete the whole installation and we are perfectly done with a successful installation of the Informatica server, DO also copy the information that appears on the final screen of installation wizard for future use and reference. One final check after the install on the Informatica services running:
Right click on MyComputer -> Manage (Computer Management), and under Services and Applications click on Services, look for the ‘Informatica Services’ and ‘Informatica Orchestration Server’, both the services should be up with the status being Started.
Hope this helps you all. Share as this might help some one 🙂
Walking on the MOON!!
July 18, 2012
Might be wondering if i am to write on some space journey!! Let me end all your excitement with the picture below.

Yeah this is how the moon feel has been brought live in the name of road re laying. Early morning i started my day with freshness of a day starting after a drizzle all through the night. I was saying to myself – ‘Great day and in chennai a wonder that happens very rare.. sun was dull and it was a feel good’. And then came the OMG moment!!
As i walked along the road near to the Bus Termainal at my residence locality (Korattur) had a great picture in front. The road being re layed. My first word seeing this – what the HELL…!! (i can sound even bad). This was horrible, i don’t understand where were these guys laying the road when we had almost 6 months of dry summer. Why is that always these activities start as it starts drizzling climate?
And this follows a month of roads being un attended due to down pour of rain and by the time climate gets friendly the roads have already back to the so called Moon surface (I mean the craters.. nope the pits and cracks..). This really creates a great amount of discomfort for the office and school goers and all the mobility of traffic stops and slows down the spped of life.
No point in complaining, just lets make sure that we send this message and make every one to think on this – not only the moment we use the road. Spread the message and get a person to think about this.
Let ur screen freeze in snow!!
December 20, 2011
This was interesting, today when i was at office my senior just showed me
this funny feature that google has added as one of its creative crisps.

Just like to share it with all of you. Its interesting and really good to
give a try. Just get to the google search page and type this text “Let it
snow” 🙂 hope you enjoy the aftermath.

Just it gives an awesome search page with the snow coming down and
gradually our monitors freezing down, this is really cool. This desrves
appreciation and definitely something different than the usual google
doodles that google has been doing day out and day in.

Thanks for reading, share it with others 🙂
SQL Query to retrieve table size (SQL Server)
December 17, 2011
Hello all, its been months since i have written a blog. Its never late than never. So let me start it right away with a post on SQL. This is my first post on SQL and hope you all find it useful.
I am today giving a post on getting the size of the tables in your database. Its very simple and we have a system defined procedure that makes your job easier. The syntax to get this is,
exec sp_spaceused ‘TABLE NAME’
You shall get the metdata information on your table as you query the above.
Lets try to get the size information on all the tables of your whole DB. Wondering how? This is even simpler, as usual to make the job easy we have got a time saving procedure to do it for us. Lets make a query to get the size of all tables,
EXEC sp_msForEachTable ‘EXEC sp_spaceused ”?”’
The question mark replaces the table names of our DB. This query returns mutiple tables of the metadata like size of every table in our database. To get a view of the metadata as a single table the following set of query can be run together,
/* CREATE A TABLE TO STORE THE INFORMATION */
CREATE TABLE #t
(
[name] NVARCHAR(128),
[rows] CHAR(11),
reserved VARCHAR(18),
data VARCHAR(18),
index_size VARCHAR(18),
unused VARCHAR(18)
)
/*INSERTING THE INFORMATION RETRIEVED TO THE TABLE*/
INSERT #t EXEC sp_msForEachTable ‘EXEC sp_spaceused ”?”’
/*VIEW THE INFORMATION FROM THE TABLE & DROPPING THE TABLE*/
SELECT * FROM #t
DROP TABLE #t /*OPTIONAL TO DROP*/
Hope this post was useful to you all. Thanks and feel free to comment and share your ideas.
The ASP.net Master Page – How this works??
February 23, 2011
What is a master page? – a master page is the aspx file that comprises of the markup that is common throughout the whole website being built with the ASP.net. For instance, most of the websites we might have noticed having a common header, footer and in few cases even the left or right side blocks. In cases like these, we can make use of the concept named Master page.

How it works? – The master page is a aspx template built as a common usage for the other content pages of our website. All we need is a single master page, defining the common areas and its markup, and the other content pages giving the markup of only the content area that varies in each of the page. The below figure might give you a clear picture of how effective your master page concept might work.

How we refer the areas in master page? – all we do in a master page is to add the master page content and its markups, and leave the changing content area with a control called as the ContentPlaceHolder. Each and every content place holder might have a name to it, such taht we can make a rference to these while making up the content aspx pages.
Here is an illustration to make it simple for you-
Step1 (create a master page)

Go for a new web project from the files menu on the top of your Visual Studio. Then as is shown above, select ASp.net Web Site, and your Language to C# (or VB as per your comfort). As the IDE opens, go in the solution explorer window, and right click over the project name to find the option “Add new item..” which opens the below window.
 From here select the Master Page, name it Site.master. The site.master comprises of the below markup code as below,
<%@ Master Language=”C#” AutoEventWireup=”true” CodeFile=”Site.master.cs” Inherits=”Site” %>
<!DOCTYPE html PUBLIC “-//W3C//DTD XHTML 1.0 Transitional//EN” “http://www.w3.org/TR/xhtml1/DTD/xhtml1-transitional.dtd”>
<html xmlns=”http://www.w3.org/1999/xhtml”>
<head runat=”server”> <title>Untitled Page</title>
<asp:ContentPlaceHolder id=”head” runat=”server”> </asp:ContentPlaceHolder></head>
<body>
<form id=”form1″ runat=”server”>
<div>
<asp:ContentPlaceHolder id=”ContentPlaceHolder1″ runat=”server”> </asp:ContentPlaceHolder>
</div> </form></body></html>
A ContentPlaceHolder control named ContentPlaceHolder1 – this ContentPlaceHolder control appears within the Web Form and serves as the region for the content page’s user interface.
A ContentPlaceHolder control named head – this ContentPlaceHolder control appears within the <head> server control and can be used to declaratively add content to the <head> element.
This is the basic master page layout. Lets try out an example, i have added the below markup code to my master page,
<form id=”form1″ runat=”server”> <div id=”topContent”> <a href=”Default.aspx”>Master Pages Tutorials</a> </div> <div id=”mainContent”> <asp:ContentPlaceHolder id=”MainContent” runat=”server”> </asp:ContentPlaceHolder> </div> <div id=”leftContent”> <h3>Lessons</h3> <ul> <li>TODO</li> </ul>
<h3>News</h3> <ul> <li>TODO</li> </ul> </div> <div id=”footerContent”> <img src=”Images/PoweredByASPNET.gif” alt=”Powered by ASP.NET!” /> </div> </form>
Also have added a css stylesheet as style.css, this is added and shall discuss in another article later, but is simply done through the solution explorer and linked with the page at the header with the <link>, as <link href=”styles.css” rel=”stylesheet” type=”text/css” />.
I have added few css styles,
#topContent { text-align: right; background-color: #600; color: White; font-size: x-large; text-decoration: none; font-weight: bold; padding: 10px; height: 50px;}
#leftContent { width: 230px; padding: 10px; font-size: 90%; text-align: left; position: absolute; top: 60px; margin-top: 10px; left: 0px;}
#mainContent { text-align: left; margin-left: 250px; padding: 10px;}
#footerContent { text-align: center; padding: 5px;}
Just we have got a sample master page ready.
Step2(Creating your content page)
As usual to add a new item, right click on to the explorer and we have the add item window, where we are to slect the Web Form, as is shown below.

Note: Do have a selection on the Select Master page check box.
then we get this window following by,
 The default markup in the content page are as below,
<%@ Page Language=”C#” MasterPageFile=”/Site.master” AutoEventWireup=”true” CodeFile=”About.aspx.cs” Inherits=”About” Title=”Untitled Page” %>
<asp:Content ID=”Content1″ ContentPlaceHolderID=”head” Runat=”Server”></asp:Content><asp:Content ID=”Content2″ ContentPlaceHolderID=”MainContent” Runat=”Server”></asp:Content>
which lists down all the ContentPlaceHolder from the master page, such that we can add different content in different content web forms and tie them all to a single master page. This is simple, easier and less error prone method to manage a web alyout. All your feed backs are welcome.
Home
October 15, 2009
Hello all….
<IMpossible says I M possible>

I have been on this platform of blogging for more than a decade which includes a few years of Apocalypses where I was away 🙂
But then this probably is the best thing I always have been loving to do and will continue writing and sharing ideas, knowledge and thoughts. Appreciate all of your feedback, comments and questions.
A quick introduction about myself: I was once a web designer, evolved into more of a Data Engineer now. I have taken all opportunities of learning and sharing all through my career and it has always given me a satisfaction when someone feels it helped them. More to come as we continue this journey..
